Modern Macrame Welcome Home Accent Rug How To
/Emily Katz with Modern Macrame is coming to our shop!
Emily Katz, author of the book Modern Macrame and textile extraordinaire is visited our store for a special book signing and class. Along with Tasha of House Sparrow Fine Nesting, we were so excited to host this very special guest.
Emily and her publisher were kind enough to share a special project from her book with our blog. Guys, Palmer and I perused a lot of cool, practical home projects from Emily's book, and we picked out this how-to for a simple home accent rug. Daly is for sure planning to make this for her house!
The writing below is all from Emily Katz and her new book, Modern Macrame:
WELCOME HOME ACCENT RUG ++
I’m an avid collector of textiles, with piles of rugs around the house, but finding the right doormat has proven a challenge. Of course, this is exactly why it pays to be a maker—when you can’t find something you want, you can make it yourself! So I knotted up just the thing I wanted, a functional, everyday basic that is adaptable in style and purpose depending on the materials used. On the following pages, you’ll find its basic pattern, plus a few variations to use as a springboard for making just the thing you want for your space.
FINISHED SIZE
22" wide by 28" long, plus 7" fringe at each end
KNOTS & TECHNIQUES (see separate PDF)
Lark’s Head Knot (LHK)
Square Knot (SK)
Alternating Rows/Rounds of Two (or More) Square Knots
Horizontal Double Half Hitch (HDHH)
SUGGESTED SETUP
Supported Dowel or Hanging Dowel (see note)
SUPPLIES
514' jute rope (¼" diameter)
Washi or masking tape
CUT LIST
Twenty-eight 18' lengths
Two 5' lengths
PREPARATION
Tape off a 22" workspace on the dowel.
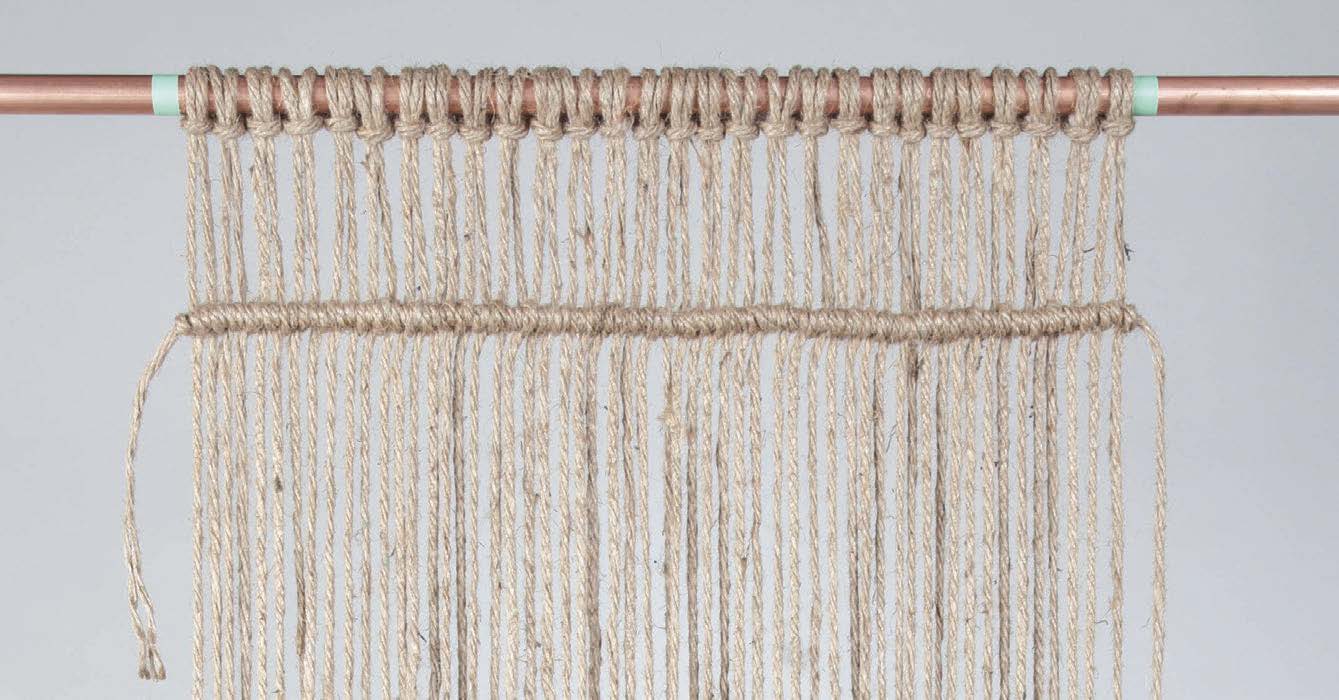
Mount all twenty-eight 18' ropes on the dowel using LHKs and space them evenly across the workspace.
Starting from the center of an LHK, measure 7" around the dowel and down the front of the leftmost cord. Mark this point with a piece of tape. Repeat on the right; then connect the two points by gently securing a length of tape horizontally across all of the cords, making sure they remain evenly spaced and are not twisted. [A]
KNOTTING
Be sure to tighten each HDHH just enough to keep it positioned directly below the LHK above it. If your knots aren’t tight enough, then this row will end up wider than you’d like. If they are too tight, the row will be too narrow.
Be careful not to incorporate the ends of the filler cord into the subsequent knotting.
Leaving an 8" tail, work a row of HDHHs from left to right around one of the 5' ropes using the tape line as a guide and removing it as you work your way across. [B]
Work 19 alternating rows of 2 SKs, or until you have roughly 12" of rope remaining on each cord. Be sure to end with a row that has SKs at its left and right edges. [C]
Directly below the last row of 2 SKs, work a row of HDHHs from left to right using the other 5' rope as the filler cord, and again leaving an approximately 8"-long tail in the filler cord before knotting.
FINISHING
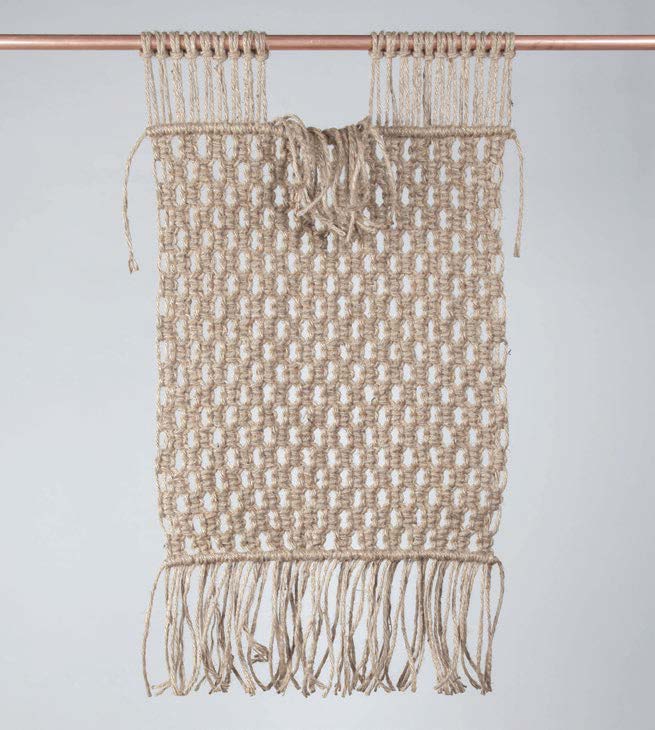
Trim all of the cords along the bottom edge, as well as both ends of the filler cords from the 2 rows of HDHH, to about 7". [D]
To create fringe at the top, cut each rope at the center of its LHK. [E] Snip one near the middle first; then work your way out toward the edges. [F]
VARIATIONS
TRY A DIFFERENT TYPE OF ROPE: The simple design of this rug lends itself to a variety of materials, from cotton to wool to synthetics. If you choose a rope with a different diameter than the one given, be aware that the size of your finished rug will differ, as will the amount of material you will need to complete it. Be sure to begin by working up a swatch (see page 34) of the knotting pattern in your chosen material.
MAKE STRIPES: Use multiple colors of rope to create vertical striping. Choose an allover striping pattern for a more traditional look or experiment with asymmetry!
TRY A DIFFERENT KNOTTING PATTERN: The allover knotting pattern I used is just one option of many that would work here. Simple ASKs would work beautifully as well, or try your hand at designing your own repeating SK pattern. As long as the knot spacing is similar to that in the pattern, you can simply use the given cut list unchanged. I don’t recommend using a less-dense knotting pattern than the one given, as it may result in a rug that is fragile and lumpy underfoot.
SHORTEN THE FRINGE: The fringe can be trimmed as short as 4" without sacrificing durability.
ADJUST THE WIDTH: To make a rug of a different width, you will need to adjust two things, the number of ropes used for knotting and the length of the two shorter ropes used as filler cords for the HDHHs.
A. How many knotting ropes? You will need to cut about 1.25 knotting ropes per 1 inch of desired width. To determine the number of ropes you will need for a rug of any width, multiply your desired width (in inches) by 1.25 and then round your answer down to the nearest even number. This is the number of knotting ropes you need to cut. For example, for a rug that is 36" wide:
36 x 1.25 = 45
So, 45 rounded down to the nearest even number gives you 44 ropes in all. Once you’ve determined how many ropes you will need, tape off a workspace of your desired width and space this number of ropes evenly across it. If you’d like to change the length of your rug as well, see Adjust the Length (at right) before you start cutting.
B. How long should the filler cords be? These ropes need to be as long as your piece is wide, plus 14" for fringe and about 4" for wiggle room. To make a 36"-wide rug, for example, you would need two ropes of 54" each, one for each row of HDHH.
ADJUST THE LENGTH: To change the length of the rug, you will need to adjust the length of the knotting ropes. For each 1 inch of finished rug length, you will need about 7¼ inches of rope length. To calculate the total length needed for each knotting rope, multiply your desired rug length (excluding fringe) by 7.25, then add 14" for fringe. For example, for a rug that is 60" long:
60 x 7.25 = 435"
435 + 14 = 449" (37'5") of length per rope
Note: Supported Dowel Clothing racks laden with tools, cut ropes, and works in progress are a constant in my studio. They’re a great place to keep everything organized and hang many kinds of projects while you work on them. If your space is limited, however, a well-secured curtain, shower, or closet rod can work just as well.
Hanging Dowel A dowel can also be hung from the ceiling using hooks and scraps of rope. To do this, first install two hooks in the ceiling several inches closer together than the length of the dowel. Then, measure how far below the hooks you would like the dowel to hang. Tie the ends of a piece of scrap rope together securely to form a loop that roughly matches this measurement when pulled taut. Repeat with a second piece of rope to form a second loop. Place one loop over each hook, and then bring the dowel through both loops so that it hangs horizontally. If you’d like to raise your work as it grows longer, simply retie the loops and make them smaller, or set the dowel directly on the hooks.
Reprinted with permission from Modern Macrame: 33 Stylish Projects for Your Handmade Home by Emily Katz, copyright (c) 2018. Published by Ten Speed Press, a division of Penguin Random House, Inc. Text and tutorial photographs (c) 2018 by Emily Katz; Interior design photographs (c) 2018 by Nicole Franzen


